Rustic Italian Yeast Bread (Crispy, Crusty, and Homemade)
This rustic Italian yeast bread recipe delivers a shatteringly crispy crust and a soft, airy crumb with minimal effort. Bake it in a Dutch oven for that authentic artisan bakery result right at home.

The Homemade Bread That Tastes Like It Came From a Roman Bakery
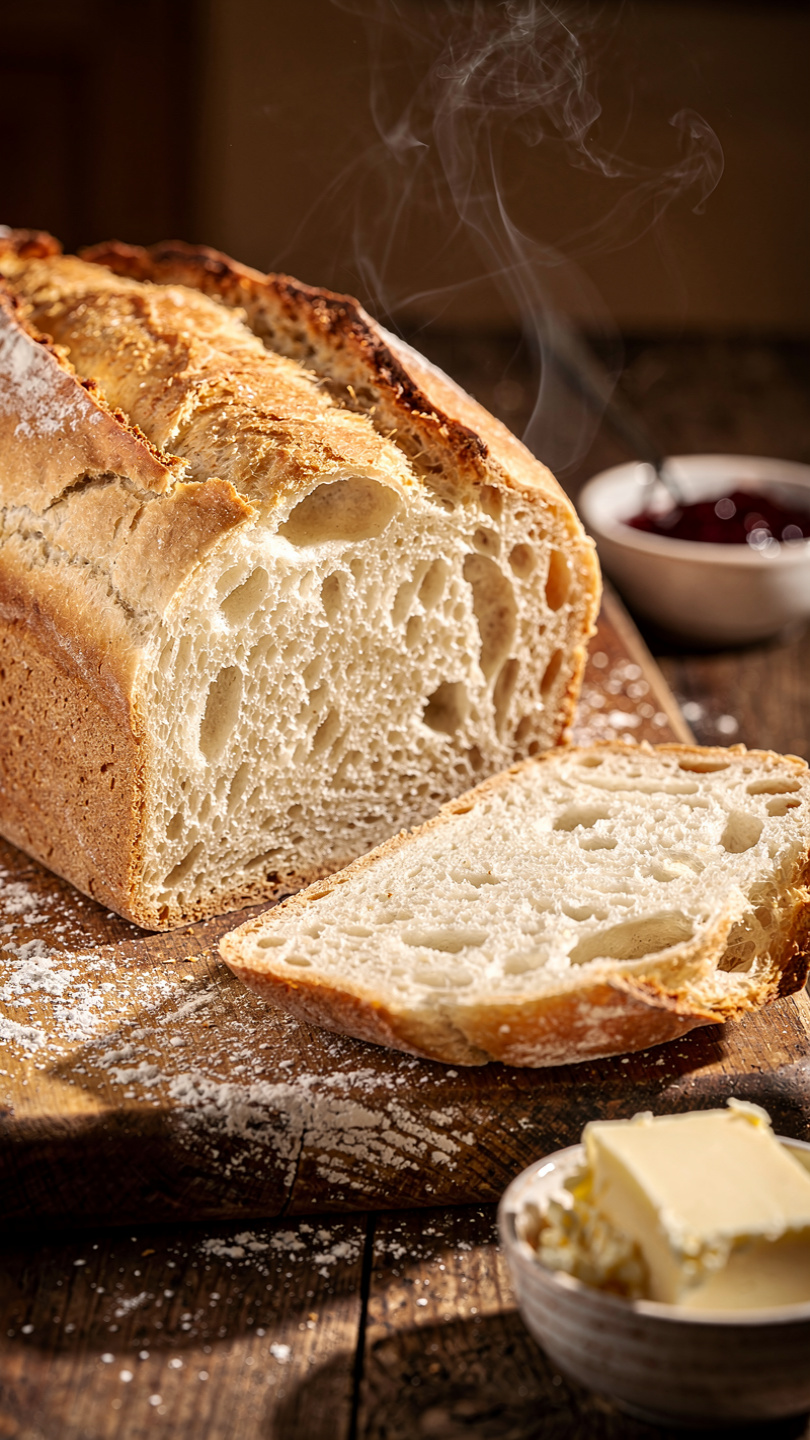
There is something almost magical about pulling a loaf of crusty Italian yeast bread from your own oven. The crust shatters when you tap it. The crumb inside is soft, chewy, and full of those irregular air pockets that make you want to tear off a piece before it even cools. This rustic Italian bread recipe is the kind of homemade bread that earns you compliments every single time, and once you make it, store-bought bread feels like a compromise.
This is not a complicated recipe. You do not need a sourdough starter, a professional deck oven, or years of baking experience. What you need is a little patience during the rise, a screaming-hot Dutch oven, and quality ingredients.
Why This Rustic Bread Recipe Works So Well
The secret to a truly crispy Italian bread crust is steam during the first phase of baking. Professional bakeries inject steam into their ovens at the start of every bake. At home, a covered Dutch oven does the exact same job beautifully: it traps the moisture released from the dough itself, keeping the crust pliable long enough for the bread to rise to its full potential before it sets into that gorgeous, shattering shell.
The recipe uses bread flour rather than all-purpose flour because the higher protein content develops more gluten, giving the loaf its characteristic chew and those open, irregular air pockets you see in authentic artisan Italian bread recipes.
Chef's Tip: Do not skip the resting period after shaping. That final 30-minute rest, called the bench proof, allows the gluten to relax and the dough to puff slightly so it rises evenly in the oven rather than tearing awkwardly at the score lines.
The Tools That Make a Real Difference
For a rustic bread recipe like this one, having the right equipment genuinely changes the outcome. A heavy Dutch oven is the single most important piece of equipment, and a bread lame or sharp scoring knife ensures your loaf blooms properly in the oven rather than cracking randomly.
Building Flavor: The Yeast and the Dough
This homemade Italian bread recipe uses active dry yeast, which needs to be proofed in warm water before it is incorporated into the flour. This extra step takes only ten minutes and tells you immediately whether your yeast is alive and active. Look for a foamy, slightly domed surface on the water. That is your yeast feeding on the sugar, and it means your bread will rise properly.
The dough itself is lean, meaning it contains no eggs, no butter, and minimal oil. Lean doughs are what produce the crispy, open crumb associated with classic crusty Italian bread. Rich doughs produce soft sandwich bread, which is wonderful but a completely different animal.
A few things that guarantee success:
- Use water between 105 and 110 degrees F. Too cold and the yeast stays dormant. Too hot and you kill it.
- Knead until the dough passes the windowpane test: stretch a small piece thin enough to see light through it without it tearing.
- Let the dough double fully during the first rise. Rushing this step means less flavor and a denser loaf.
- Score the top confidently and deeply. Shallow scores seal back up in the oven.
From Shaggy Dough to Artisan Loaf
This rustic Italian bread recipe moves through two simple rises and then straight into a blazing hot Dutch oven. The result is a loaf with a crust that crackles audibly as it cools on the rack, a deep golden exterior, and a tender, slightly chewy interior that is perfect for dipping into olive oil, piling with bruschetta toppings, or simply eating warm with good salted butter.
Ready to bake your best loaf yet? Here is everything you need:
Rustic Italian Yeast Bread (Crispy, Crusty, and Homemade)
This rustic Italian yeast bread recipe delivers a shatteringly crispy crust and a soft, airy crumb with minimal effort. Bake it in a Dutch oven for that authentic artisan bakery result right at home.
Ingredients
- 3 cups bread flour, plus more for dusting
- 2 1/4 tsp active dry yeast, one standard packet
- 1 1/4 cups warm water, between 105 and 110 degrees F
- 1 1/2 tsp fine sea salt
- 1 tsp granulated sugar, to activate the yeast
- 1 tbsp extra virgin olive oil, plus extra for greasing the bowl
Instruction
In a small bowl, combine the warm water and sugar. Sprinkle the yeast over the top and let it sit for 5 to 10 minutes until it becomes foamy and fragrant. If it does not foam, your yeast may be expired or your water too hot.
In a large mixing bowl, whisk together the bread flour and salt. Make a well in the center and pour in the yeast mixture and olive oil.
Stir with a wooden spoon or dough scraper until a shaggy dough forms, then turn it out onto a lightly floured surface.
Knead the dough by hand for 8 to 10 minutes until it is smooth, elastic, and slightly tacky but not sticky. Alternatively, use a stand mixer fitted with a dough hook on medium speed for 6 minutes.
Lightly oil a large bowl, place the dough inside, and turn it to coat. Cover with plastic wrap or a damp kitchen towel and let it rise in a warm spot for 1 to 1.5 hours, or until doubled in size.
Punch the dough down gently to release the gas. Shape it into a round boule by folding the edges underneath and pulling the surface taut.
Place the shaped dough on a piece of parchment paper. Cover loosely and let it rest for 30 minutes while you preheat the oven.
Place a Dutch oven with its lid inside the oven and preheat to 450 degrees F (230 degrees C) for at least 30 minutes.
Score the top of the dough with a sharp knife or bread lame in a cross or slash pattern, cutting about 0.5 inch deep. This allows the bread to expand beautifully in the oven.
Carefully lift the parchment paper with the dough and lower it into the hot Dutch oven. Cover with the lid and bake for 25 minutes.
Remove the lid and continue baking for 18 to 20 minutes more, until the crust is a deep golden brown and the loaf sounds hollow when tapped on the bottom.
Transfer to a wire rack and let cool for at least 30 minutes before slicing. Cutting too early releases steam and makes the crumb gummy.
Equipment
- Large mixing bowl
- Small bowl
- Wooden spoon or dough scraper
- Stand mixer with dough hook (optional)
- Dutch oven (5 to 7 quart)
- Parchment paper
- Bread lame or sharp serrated knife
- Wire cooling rack
- Kitchen thermometer (optional but helpful)
Notes
Serving and Storing Your Homemade Italian Bread
Serve this bread warm, ideally within an hour of baking, when the crust is at its most dramatic and the crumb is still slightly soft from the residual heat. It pairs beautifully with a simple drizzle of extra virgin olive oil, a bowl of marinara for dipping, or alongside a hearty pasta dinner.
For storage, wrap the completely cooled loaf in a clean kitchen towel rather than plastic. Plastic traps moisture and turns that magnificent crust soft and chewy within a few hours. At room temperature in a towel, you will have a reliably good crust through the next morning.
Want to make it ahead? After the first rise, punch the dough down, shape it, and refrigerate it covered on the parchment-lined pan for up to 16 hours. Pull it out 30 minutes before baking while your oven and Dutch oven preheat. Cold-fermented dough develops a noticeably deeper, more complex flavor that makes this already excellent bread taste even more like something from a proper Italian bakery.