Amish White Bread Recipe (Soft, Fluffy Homemade Loaf)
This classic Amish White Bread recipe bakes up impossibly soft, fluffy, and golden with just a handful of pantry staples. It's the best homemade Amish bread you'll ever pull from your oven.

The Softest Loaf You Will Ever Bake at Home
There is a reason this Amish White Bread recipe has been passed down through generations and pinned to kitchen bulletin boards across the country. It is simple, honest, and absolutely perfect. Two tender, golden loaves with a paper-thin crust, a pillowy soft crumb, and just the right hint of sweetness. This is the kind of bread that makes your whole house smell like a bakery and disappears from the counter before it has fully cooled.
Whether you call it Easy Amish Bread, Homemade Amish Bread, or simply the best loaf you have ever made, the result is the same: thick slices slathered with butter, dunked in soup, or piled high with your favorite sandwich fillings. Once you make it, store-bought bread will never feel the same again.
What Makes Amish White Bread Different?
Traditional Amish Yeast Bread is known for three things: its gentle sweetness from a slightly higher sugar ratio than most white bread recipes, its incredibly soft, cloud-like crumb, and its utter simplicity. There is no tanginess like you would find in an Amish Sourdough Bread, no enriched dough loaded with eggs, and no complicated techniques. Just flour, water, yeast, oil, sugar, and salt working together in perfect harmony.
The sugar does double duty here. It feeds the yeast for a reliable, active rise, and it gives the finished loaf that signature mild sweetness that makes this Homemade Amish Bread so snackable straight from the pan.
Tips for the Best Amish Bread Recipe
Before we get into the steps, a few things that will take your Amish White Bread Recipe Homemade from good to bakery-worthy:
- Temperature is everything. Yeast is sensitive. Water between 105°F and 115°F is ideal. Too hot and you kill the yeast. Too cold and it sits there doing nothing. An instant-read thermometer is your best friend here.
- Do not rush the rises. Both the first and second rise develop flavor and that signature fluffy texture. Find a warm spot in your kitchen and let the dough do its thing.
- Flour your surface lightly. Too much extra flour worked in during shaping makes a dense, dry loaf.
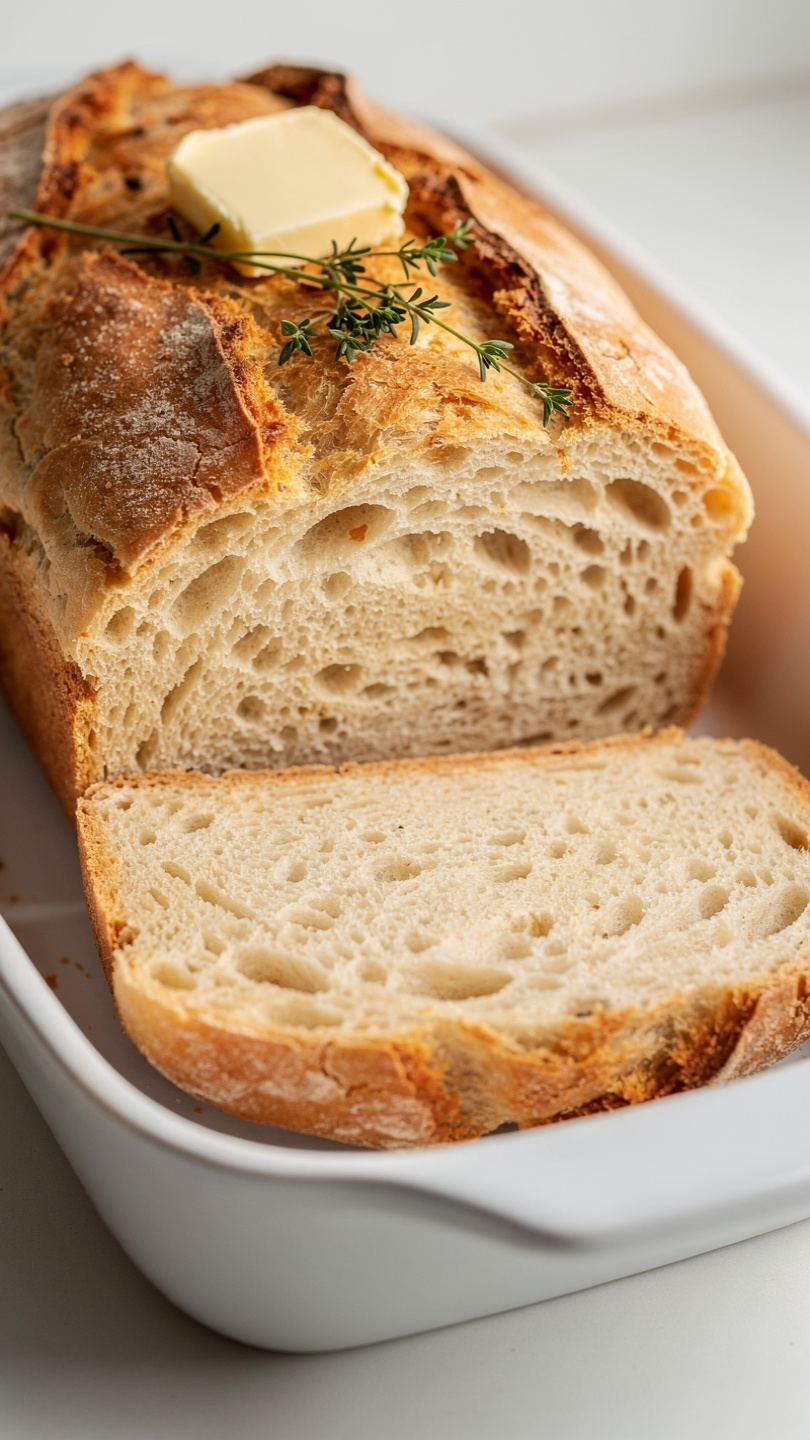
- Brush with butter straight out of the oven. This is the secret to that soft, glossy crust that is impossible to resist.
Chef's Tip: For the warmest rising spot in your kitchen, preheat your oven to 200°F, then turn it off. Place your covered bowl inside with the oven door cracked open. The gentle residual warmth creates the perfect proofing environment.
Using quality tools and ingredients makes a real difference with any yeast bread. A reliable stand mixer with a dough hook saves you 10 minutes of hand kneading, and a good instant-read thermometer means you will never overbake or underbake again.
How To Make Amish Bread: Step by Step
This Best Amish Bread Recipe yields two full loaves, each with about 12 generous slices. Here is what to expect from start to finish:
- Proof the yeast in warm water with a spoonful of sugar. You are looking for a foamy, fragrant mixture after about 10 minutes. If nothing happens, start over with fresh yeast.
- Mix and knead the dough until it is smooth and elastic. This takes about 8 to 10 minutes in a stand mixer or 10 minutes by hand.
- First rise: Let the dough double in size, about 1 hour.
- Shape into two loaves and settle them into greased pans.
- Second rise: Let the dough crown above the pan rim, about 30 to 45 minutes.
- Bake at 350°F for 28 to 32 minutes until deeply golden and hollow-sounding when tapped.
- Butter and cool on a wire rack before slicing.
Total active time is minimal. Most of this recipe is just waiting for beautifully risen dough.
Ready to bake your own Amish Loaf Bread? Here is the complete recipe:
Amish White Bread Recipe (Soft, Fluffy Homemade Loaf)
This classic Amish White Bread recipe bakes up impossibly soft, fluffy, and golden with just a handful of pantry staples. It's the best homemade Amish bread you'll ever pull from your oven.
Ingredients
- 2 cups warm water, between 105-115°F (warm to the touch but not hot)
- 1/8 oz active dry yeast, two standard 0.25 oz packets
- 3/8 cup white granulated sugar, divided; feeds the yeast and adds gentle sweetness
- 1/4 cup vegetable oil, canola oil works equally well
- 1 1/2 tsp salt
- 6 cups all-purpose flour, spooned and leveled; bread flour also works for a chewier crumb
Instruction
In the bowl of a stand mixer (or a large mixing bowl), combine the warm water, both packets of yeast, and 1 tablespoon of the sugar. Stir gently and let sit for 5 to 10 minutes until the mixture becomes foamy and fragrant. If it does not foam, your yeast is not active and you should start over with fresh yeast.
Add the remaining sugar, vegetable oil, and salt to the yeast mixture. Stir to combine.
Add the flour one cup at a time, mixing on low speed (or stirring by hand) after each addition. Once a shaggy dough forms, increase to medium speed and knead for 8 to 10 minutes using the dough hook, until the dough is smooth, elastic, and slightly tacky but not sticky. If kneading by hand, turn the dough onto a lightly floured surface and knead for 10 minutes.
Shape the dough into a ball and place it in a lightly oiled bowl, turning once to coat. Cover the bowl with plastic wrap or a clean kitchen towel and let rise in a warm, draft-free spot for 1 hour, or until the dough has doubled in size.
Punch the dough down firmly to release the gas. Turn it out onto a lightly floured surface and divide it evenly into two equal portions.
Shape each portion into a smooth loaf by flattening it into a rectangle roughly as wide as your loaf pan, then rolling it up tightly from the short end. Pinch the seam closed and place seam-side down into two greased 9x5 inch loaf pans.
Cover loosely with plastic wrap or a clean towel and let rise again for 30 to 45 minutes, until the dough crowns about 1 inch above the rim of the pans.
While the dough is on its second rise, preheat your oven to 350°F (175°C).
Bake the loaves for 28 to 32 minutes, until deeply golden on top. When you tap the bottom of a loaf, it should sound hollow. An internal temperature of 190 to 200°F (88 to 93°C) confirms doneness.
Remove the loaves from the pans immediately and transfer to a wire rack. Brush the tops with softened butter for a soft, glossy crust. Let cool for at least 20 minutes before slicing.
Equipment
- Stand mixer with dough hook (or large mixing bowl for hand kneading)
- Two 9x5 inch loaf pans
- Instant-read thermometer
- Wire cooling rack
- Plastic wrap or clean kitchen towels
- Pastry brush
Notes
Serving, Storing, and Freezing Your Loaves
This Amish White Bread Recipe makes two loaves, which is intentional. Eat one fresh and freeze the other for later.
Serving ideas:
- Thick slices with salted butter and honey
- Classic PB&J sandwiches (this bread is pure nostalgia for it)
- Torn into chunks alongside a bowl of tomato soup or beef stew
- Toasted and topped with avocado or a fried egg
Storage: Wrap cooled loaves tightly in plastic wrap and keep at room temperature for up to 4 days. For freezing, slice first so you can pull out individual pieces as needed. Frozen loaves keep well for up to 3 months.
Whether this is your first time baking bread or your hundredth, this Homemade Amish Bread recipe will earn a permanent spot in your kitchen rotation. It is forgiving, reliable, and deeply satisfying in a way that only a beautiful homemade loaf can be.